Using the calendar
Day and week views, creating bookings, moving bookings, blocking time, holidays, and how buffer and processing time are shown.
The Calendar is where you'll spend most of your day. It's a live view of every booking for your location, colour-coded by status.
Day view
The day view shows a single day with one column per staff member. Each booking is a coloured block spanning its start and end times.
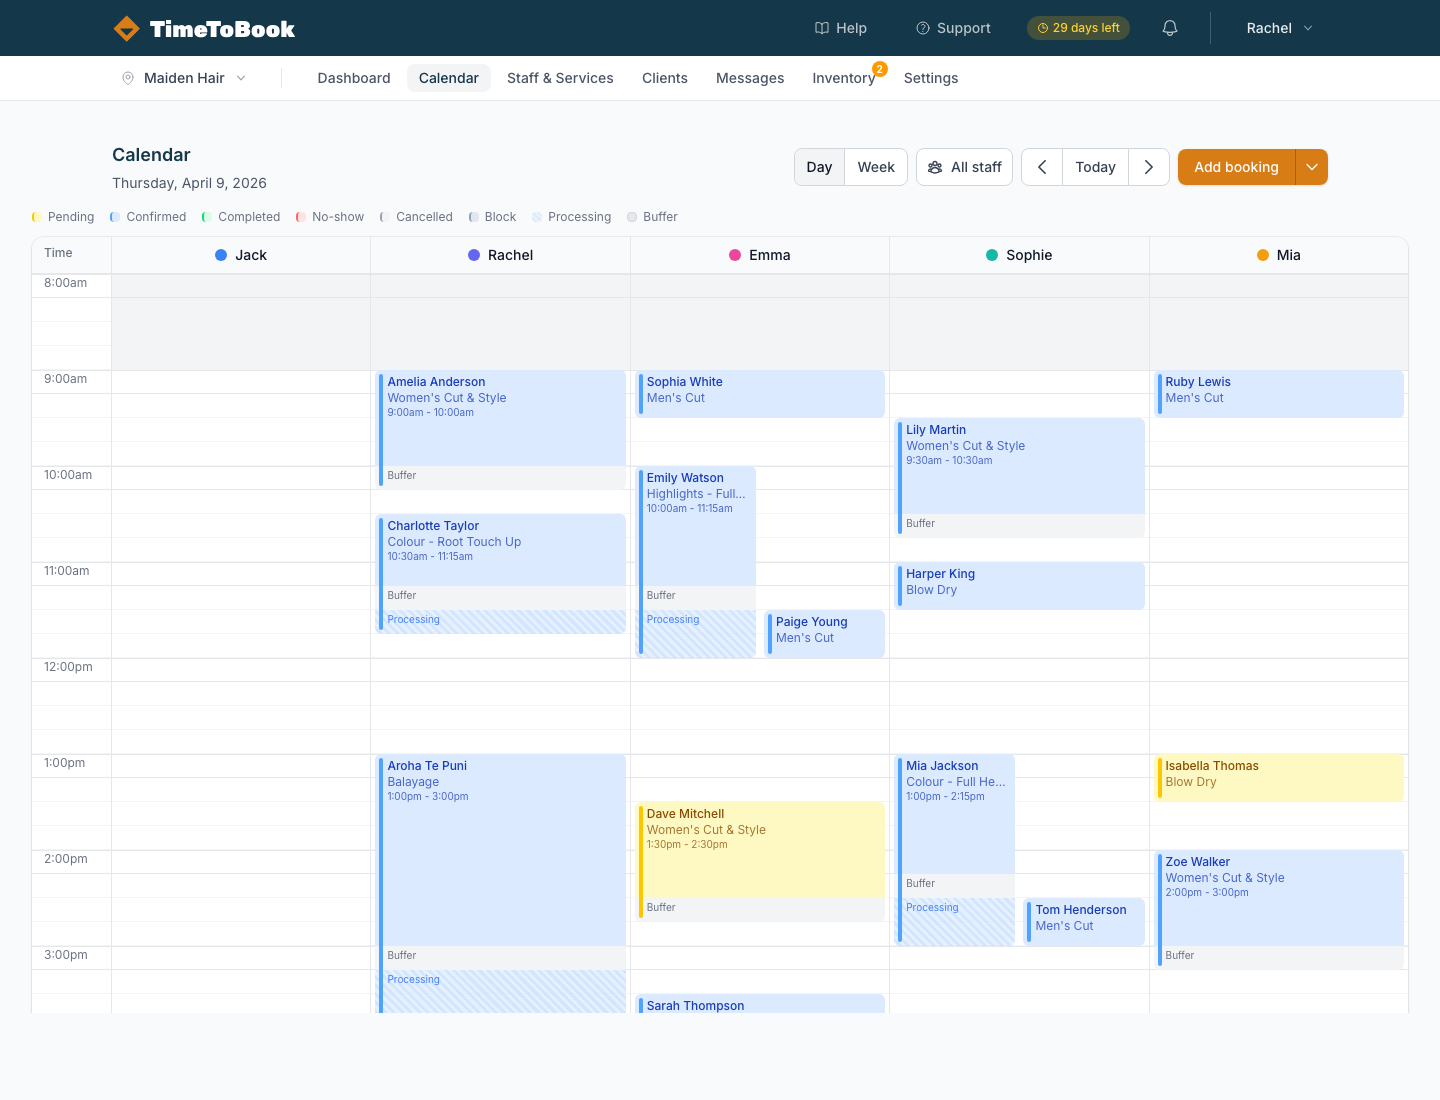
Across the top of the calendar you'll see:
- Day / Week toggle: switch between single-day and full-week views.
- Staff filter: choose which staff columns to show, or pick All staff.
- Date navigation:
<and>step day by day (or week by week). Today jumps you back to today. - Add booking: create a manual booking. The small arrow beside it opens a menu with Block time.
Down the left side is the time axis. Each row is 15 minutes, with a time label every hour. The calendar shows your business hours for that day, defined in Settings → Business Hours, plus an extra hour either side. If you're closed that day, it shows 9am to 6pm. Times outside a staff member's working hours are shaded grey.
The status legend
Above the grid, a small legend shows what each colour means:
- Pending: booked but not yet confirmed.
- Confirmed: the default for most bookings.
- Completed: the appointment has been finished.
- No-show: the client didn't turn up.
- Cancelled: cancelled by you or the client.
- Block: lunch, meetings, days off, or any other blocked time.
- Processing: a striped strip showing hands-off time after a service (e.g. colour developing).
- Buffer: time set aside after a service, e.g. to clean the station.
Processing and buffer time are drawn just below the main booking, so you can see the full footprint of an appointment at a glance.
Booking statuses
Open any booking to change its Status. The options are Pending, Confirmed, Completed, Cancelled and No Show.
Once a booking's start time has passed, a pending or confirmed booking shows a Mark Complete button at the bottom of the panel. It sets the status to Completed in one click.
Week view
The week view shows Monday to Sunday. With several staff showing, each row is a staff member and each column is a day, with a summary of that day's bookings. Click any day header to jump into the day view. If you filter down to a single staff member, the week view switches to a full time grid for that person across all seven days.
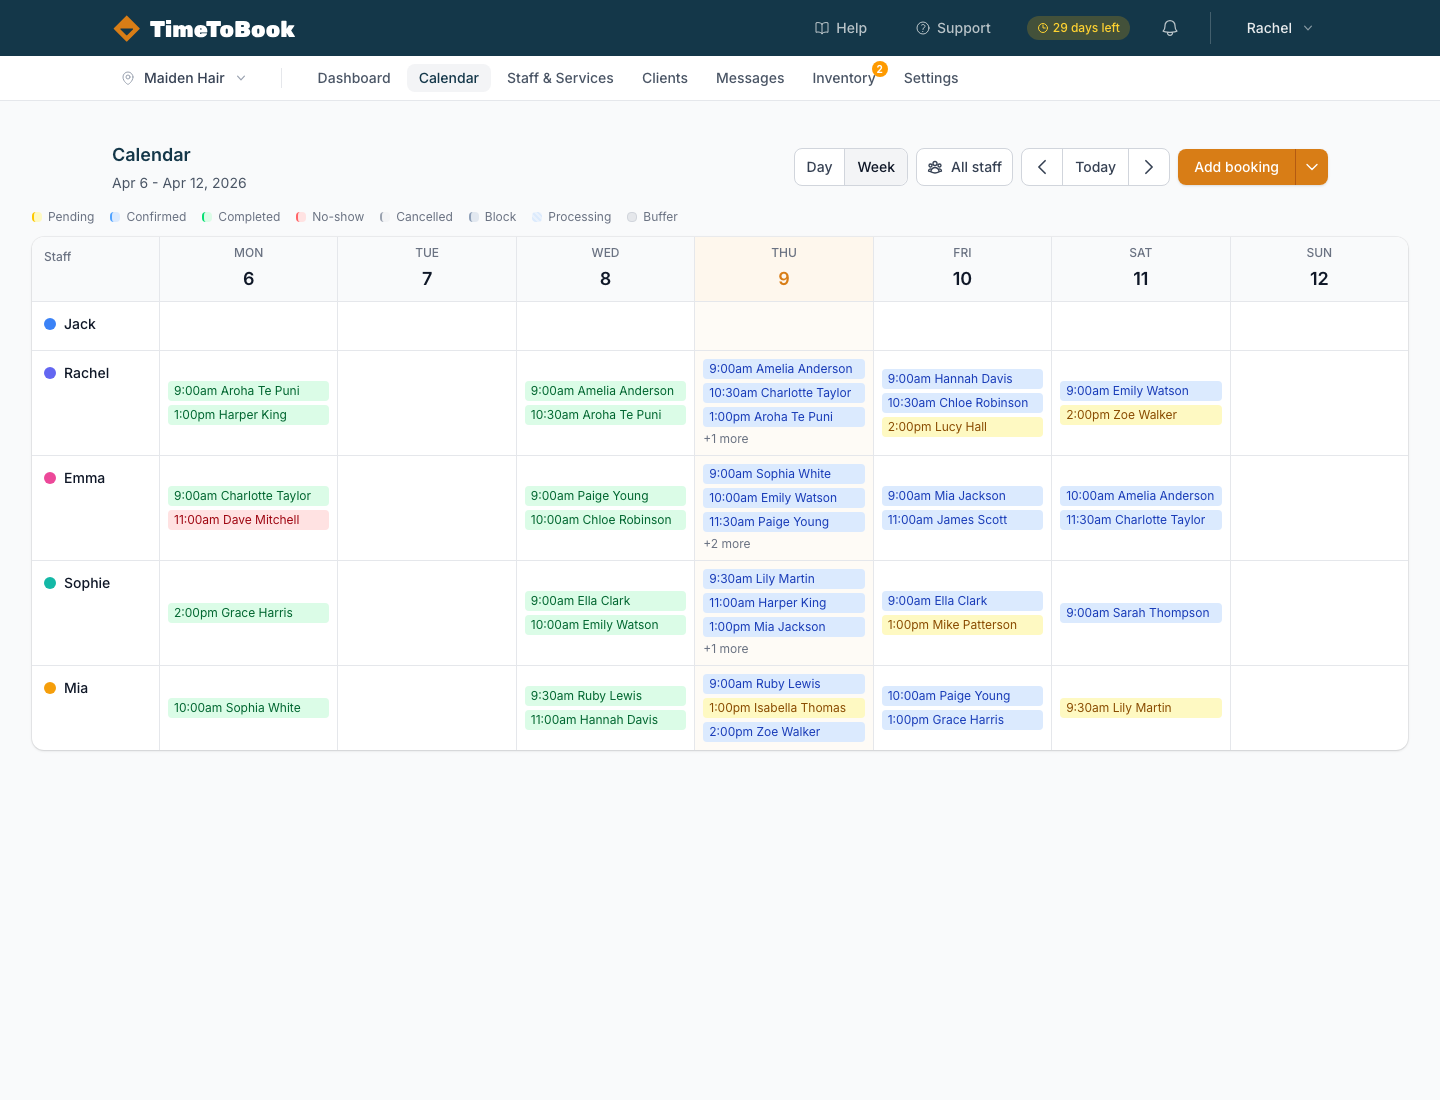
Week view is best for planning ahead and spotting quiet days. Day view is better for running your shift.
Creating a booking
There are three ways to create a booking:
- Click a time slot: click an empty slot within a staff member's working hours and the booking panel opens, pre-filled with that time and staff member.
- Click Add booking: opens the same panel with no pre-fill.
- Online: clients create their own bookings through your public booking page.
In the booking panel you can pick a client (or create a new one on the fly), add one or more services, assign staff, and set the date and time. The time picker moves in 15-minute steps.
When you're ready, there are two buttons:
- Create Booking saves the booking without messaging the client.
- Create & Notify saves it and sends the client a booking confirmation. This needs a client selected.
If the time overlaps another booking or a block for that staff member, the booking isn't saved and you'll see "Cannot save: conflicts with another booking". Pick a different time or staff member.
Booking notes
Each booking has a Notes tab. Notes you type here stay with the booking. If a client leaves a note when they book online, it appears on the Notes tab too.
Multi-service bookings
Need to book a cut and colour back to back? Add multiple services to a single booking. The calendar draws them as a connected group. Each service starts after the previous one finishes, including its processing or buffer time, so your client's total time in the chair is accurate.
Service rows in the booking panel can be reordered by dragging the handle on each row. This is handy if you want the colour to happen before the cut.
Moving a booking
On a computer, click and drag a booking to move it to a different time or staff member. Grouped bookings (multi-service) move together, keeping the gaps between services. Dragging always moves a booking; it never makes a copy.
On a phone or tablet, dragging is turned off so you can't move a booking by accident while scrolling. Tap the booking to open it, change the date or time, and tap Save Changes.
Either way, if the new time overlaps another booking or a block, the move is refused and the booking stays where it was.
Blocking time
Block time lets you reserve part of a staff member's calendar for anything that isn't a client appointment: lunch, cleaning, meetings, training, days off, or holidays.
Creating a block
- Click the arrow on the Add booking button and choose Block time. On a computer, you can also right-click an empty slot and choose Block time.
- Optionally give it a title, e.g. "Lunch", "Staff meeting", "Holiday".
- Pick the date, start time, staff member and duration (15 minutes up to 10 hours).
- Click Create Block.
The block appears on the calendar as a grey bar. Clients won't be offered any times that overlap it on your public booking page, and you can't save a booking over it either. Bookings that already exist in that time stay where they are, so move them first if needed.
Recurring blocks
When creating a new block, you can set it to Repeat:
- Does not repeat
- Daily (weekdays only): Monday to Friday.
- Daily (every day): seven days a week.
- Weekly on specific days: tick the days you want (e.g. Monday and Wednesday).
Tick Repeat forever, or untick it and choose a Repeat until date.
Only blocks can repeat. Client bookings can't be set to repeat.
The repeat setting can only be chosen when you first create a block. To change how often it repeats, open it, click Delete series, and create a new one.
Editing and deleting blocks
Click any block on the calendar to open it. For a one-off block you can change the title, date, time, staff or duration, or click Delete block.
For a repeating block, change the title, time, length or staff and then choose how far the change reaches:
- Save this occurrence changes just that day. The rest of the series stays as it was.
- Save series applies the change to every occurrence. The series keeps its original start date and repeat pattern.
To remove it:
- Delete this occurrence removes just that day, e.g. if you're working through lunch on a busy Saturday. The rest of the series continues.
- Delete series removes every occurrence.
On a computer, one-off blocks can be dragged to a new time or staff member, and resized from their bottom edge. Repeating blocks can't be dragged or resized.
One block per staff member
Each block applies to a single staff member. If you need to block the same time for your whole team (e.g. a team meeting), create a block for each person.
Holidays and days off
There's no separate time off setting, so use blocks:
- Create a block for the staff member starting at the beginning of their day, with a duration that covers the whole day (up to 10 hours; for a longer day, add a second block).
- For more than one day, set Repeat to Daily (every day), untick Repeat forever, and set Repeat until to their last day off.
- Repeat for each staff member who's away.
Clients won't be able to book them online during that time. Check the calendar for any bookings already in that period and move or cancel them.
For a regular day off each week, it's simpler to change the staff member's working hours instead. See Managing staff.
Rebooking a regular client
There's no repeat or "book again" button for client appointments. To rebook a regular, create their next booking yourself, for example while they're at the counter after their appointment. Click a slot on the date you've agreed (or use Add booking), pick the client and service, and save.
Booking during another client's processing time
Processing time is hands-off time after a service: the stylist isn't actively working on that client. That means you can fit a second, shorter client into the processing window.
On the calendar, processing shows as a narrow striped strip below the booking. To book into that window:
- Click the empty slot beside the striped strip at the time you want. Clicking the strip itself opens the original booking.
- Or click Add booking and set the start time to fall inside the processing window.
Buffer time is different: it blocks the staff member, so you can't book over it.
If the new booking would overlap the next service or anything else on that staff member's calendar, it won't save, so choose a service that fits the gap.
A classic example: a full head colour with 45 minutes of developing time leaves a 45-minute window where the stylist can fit in a men's cut or a blow dry.
Still stuck?
Our support team is ready to help.